Updating old blog posts is not the most glamorous of website publishing tasks but it is an important one, and it can have remarkable benefits for your SEO efforts!
As content creators, we all know that producing valuable, high-quality blog content consistently is key to running a successful website.
But did you also know that you need to maintain that content or it could lose value over time?
That’s why updating old blog posts—those bringing in your core organic traffic—is so important. With a few strategic updates, your content can shine like new again. Keeping your content up to date is also a positive signal to Google that your site maintained and current.
Today we will review how to update old blog posts for SEO, so you can increase your organic traffic, rise in search rankings, and get more mileage out of the content you already have worked so hard to create.

Get personalized content recommendations and answers drawn from our website. Simply type your question or topic of interest, and our AI assistant will help you find relevant articles, tips, and insights. You can also have a natural conversation to explore topics in more depth.
Phase 1: Identify Posts to Update
Step 1 – Review Your Evergreen Content
Your evergreen content—also known as cornerstone content or pillar content—is a good place to start when assessing old blog posts to update. Evergreen content focuses on a broad, core topic of your niche. It will always be something that searchers are looking for, and the information about these topics should not change too drastically over time.
These may be the first posts you’ve ever written, and that means if you are not staying on top of them, they can become outdated.
Make a list of your website’s evergreen content in a spreadsheet. You can mark it with a high priority color if that helps you.
Step 2 – Use GSC to Identify Posts Already Getting You Traffic
You don’t want to arbitrarily pick the posts you’ll be updating. It’s best to rely on data and other indicators to decide if the post is worth updating.
Check Google Search Console to see what terms you are already being shown for in SERPS (impressions) and receiving traffic for (clicks).
You can export the entire list of search queries into a CSV file, Excel, or Google Sheets.
How to Export Your GSC Queries:
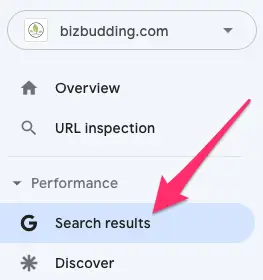
Log into Google Search Console > Select your property > Select Performance > Change the timeframe to filter by if desired (we like to use 12 months generally) > Click on Export in the upper right > Choose file type.
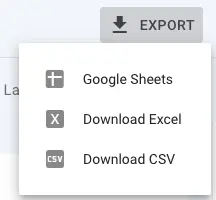
When you export the data from GSC, it will include queries, clicks, impressions, CTR (click-through-rate), and position.
Go through the spreadsheet you just exported and highlight any queries for which you are receiving high clicks with one color and high impressions with another. Ignore branded terms.
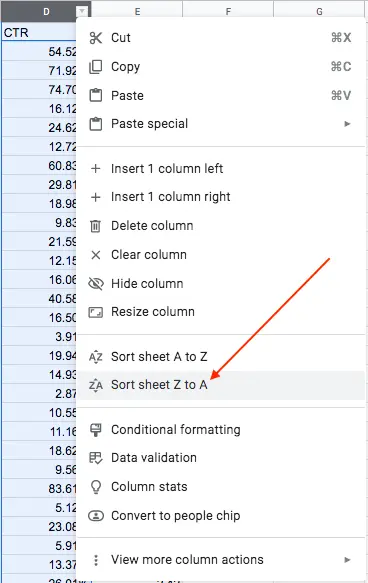
Make new columns in your sheet for monthly search volume and competition, as these will factor into the priority order you give to your post updates. There are a number of free tools you can use to check this data including SearchVolume, SEOReviewTools, SEMrush, Moz, and others, but keep in mind, free search tools are typically limited in some way. If you are not able to check the competition with the tools you are using, you can leave this off.
Generally, you want to give priority to posts with high clicks and/or impressions, high monthly search, and low competition. Of course, this is flexible if a term is critical to your business and revenue generation.
Step 3 – Audit Your Site for Duplicate Content
If you have duplicate content on your website, there may be an opportunity to remove or combine these pages/posts. I am going to cover a few different methods to check your site for duplicate content. These methods require the use of paid tools. BizBudding can also run a website audit for you and provide you with the results.
If you are confident that duplicate content is not an issue on your site, you can skip this step. For the purposes of this duplicate content audit, you are looking for pages or posts that are nearly identical. This really only happens when content has been copied or plagiarized. Check out our post, What Causes Duplicate Content Issues?, if you’d like to learn more.
Method 1: Run a Sitebulb Audit
Sitebulb is our favorite tool for website audits. You must purchase a license, and then you install it on your computer. Once your audit has finished running, look for the hint called “URLs with similar content” under SEO > Duplicate Content.
Sitebulb defines duplicate content as:
URLs that have substantially similar HTML content to at least one other indexable URL. This could also be referred to as ‘near duplicate content’, where most of the HTML content on the pages is the same – without all the content being identical. If this sort of duplication occurs, it may be serious issue, as URLs with almost identical content are accessible to search engine crawlers, which could trip quality algorithms like Google’s Panda.
If there are none or they have to do with structure or setup issue, you can move on (though you probably should address them at some point).
Run an SEMrush Audit
SEMrush is also a paid tool with a really nice audit tool built in. Once you have set up a project for your domain, you can run a site audit to identify duplicate content.
Look under the Errors tab for “duplicate content issues”.
SEMrush defines these as:
Webpages are considered duplicates if their content is 85% identical. Having duplicate content may significantly affect your SEO performance. First of all, Google will typically show only one duplicate page, filtering other instances out of its index and search results, and this page may not be the one you want to rank. In some cases, search engines may consider duplicate pages as an attempt to manipulate search engine rankings and, as a result, your website may be downgraded or even banned from search results. Moreover, duplicate pages may dilute your link profile.
Duplicate content is not always the result of copied or plagiarized content. More often than not, it is the result of an incorrect structural setup. A good example of this is near identical products in a shop (such as the same t-shirt in different colors) lacking canonical links.
Step 4: Audit Your Website for Thin Content
Thin content is a problem because search engines see it as low value for readers. It will not rank well and can even dilute your domain authority.
For thin content, the main issues you want to be on the lookout for are:
- low text-HTML ratio and
- low word-count
Both can be found under the “Warnings” tab in your SEMrush audit. They are related, but not exactly the same. Let’s take a look.
Low Text-HTML Ratio
SEMrush defines a low text-HTML ratio as:
Your text to HTML ratio indicates the amount of actual text you have on your webpage compared to the amount of code. This issue is triggered when your text to HTML is 10% or less.
Search engines have begun focusing on pages that contain more content. That’s why a higher text to HTML ratio means your page has a better chance of getting a good position in search results.
Low Word Count
SEMrush defines a low word count as:
This issue is triggered if the number of words on your webpage is less than 200.
The amount of text placed on your webpage is a quality signal to search engines.
Search engines prefer to provide as much information to users as possible, so pages with longer content tend to be placed higher in search results, as opposed to those with lower word counts.
This is the one you want to especially be concerned with. A low word count is not always a bad thing though. Some pages will naturally have low word count (e.g. confirmation pages or author pages, etc). The pages you don’t want having a low word count are your core pages and your blog posts.
If you find your site has a lot of URLs with both of these issue, it’s likely that you are dealing with a lot of thin content, that could benefit from being expanded upon or combined.
Step 5: Manually Review Your Posts to Find Very Similar Content
Next, you want to check your site for posts on the same or a very similar topic to those that you have prioritized for a refresh. Consider combining the posts, especially if they are thin content (more on this in step 4) and under-performing (see GSC data). You can combine them into a new post that is much stronger and more thorough.
This step requires a lot of time from you, but it is worth the time, because the methods above are only able to locate duplicate content on your website, not content that is very similar.
What’s the difference? Duplicate content, as mentioned above, has to do with the words and/or html on the page being nearly identical to another page on the same website.
Content that is very similar on the other hand, may have very little exact match phrases or html, but the topics are very similar. Basically, it’s like having two posts about the same thing, in different words. One may include some things that the other does not or take a slightly different angle, but generally this is a poor SEO strategy.
To review your website for similar content, do the following:
- Pull a list of all blog posts. If you’re blog is very large, you may want to start with one category at a time. Optionally, you can use the Advanced Custom Fields plugin to make this easier. This plugin also allows you to show additional useful fields in the backend (and export them) such as keyword, slug, and more.
- Group your content based on topic or category.
- Look at the posts in each group. Are there any that sound very similar? If so, take a look at each one and compare. Are they different enough to warrant keeping separate?
- If you decide to combine two or more posts together, you should keep the one with the best performance and/or the most backlinks. Look up the posts in GSC to check performance, paying attention to impressions, clicks, and CTR. Clicks/CTR have the most value, because that means people are actually viewing your posts.
- Make note of the posts you’ll be keeping and the ones you won’t in a spreadsheet.
Phase 2: Research Specific Posts & Identify Gaps
Step 1 – Assess Your Target Keywords & Build a List of Terms
Now that you have honed in on which old blog posts to update, take a look at your target keyword for each post. Is it still the best choice?
If you think it is, great! If you don’t think so, do some keyword research to choose a new keyword base on the content topic, high search volume, low competition, and search intent (the goal or desired outcome associated with the search query).
Once you have decided on your keyword, brainstorm a list of keyword variants, synonyms, and related terms and drop those intro a spreadsheet. You will continue building this list in the next step. (Note: Yoast Premium also allows you to input synonyms and related keywords.)
Step 2 – Research the Top-Ranking Posts for Your Focus Keyword
Google the search query you intend to target and look at the top 3-5 posts. You can go through the entire first page of the search engine rankings if you wish, but this is a time intensive process, so start if you are working solo or only have a small team at your disposal.
Note commonly used words, phrases, questions, headings, topics, layout, and other content elements such as videos and infographics in a the same spreadsheet from step 3.
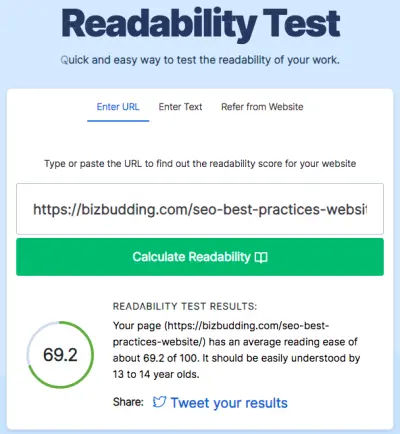
You may also want to check the word count and readability. Use the Flesch-Kincaid Readability index to test the readability of competitor content. Below is an example from our blog.
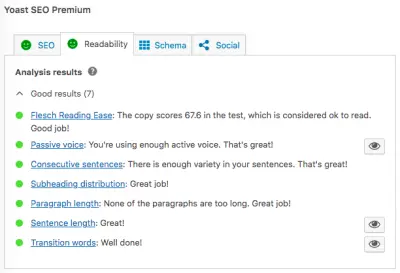
You can run your own content through as well to compare or check the “Readability” tab in Yoast when in the blog post editor (as seen below), which scores your content based on the same index.
Step 3 – Ask What You Can Add to the Conversation
While everything in the previous step is important, high-quality content is more than a collection of key terms and more than algorithms. People want to read what you have to say that is new and different. Think about what you can add to your post that’s different/unique to your expertise and look for content gaps—important information that others may not have addressed.
Also, strive to be transparent and objective in your writing. It’s fine if you feel strongly about a topic and that comes out in your writing, but you don’t want to obscure or manipulate facts that may be relevant to your audience if it contends with your view. Transparency goes a long way to building trust, so don’t be afraid to tackle opposing opinions.
Phase 3 – Update the Content & Track
Step 1 – Update the Content
Update the content with the terms and other elements you found to be important from your research.
It’s okay if you do not include every single term, but you definitely want to include those that are the most important to your topic and that make sense for your particular piece of content.
Step 2 – Check Your On-Page SEO
Follow standard copywriting and SEO best practices. Use the keyword, but do not keyword stuff—utilize the keyword variants you identified in step 3. Include an author box, TL;DR or excerpt, references if citing sources, no plagiarism, and on-page SEO (meta description, alt text, SEO title).
Step 3 – Track Your Updated Content in Google Analytics
Add posts to Google Analytics tracking segments and create annotations to monitor performance and reference back.
How to Create an Annotation in Google Analytics
Let’s start with how to create an annotation.
Go under a view such as Behavior > Site Content > Landing Pages, click the arrow under the graph, then click +Create new annotation.

From there you can select your date and put in your note. Save when done.
How to Set Up a Tracking Segment for Updated Posts
This involves setting up a new segment two filters: landing pages (the URLs you have updated in this case) and the source/medium, “organic” (representing only organic traffic).
We recommend periodically comparing your new segment for optimized content to an overall organic traffic segment so you can get understand if changes are a result of your updates or larger factors affecting your entire website.
Organic traffic can be affected by many different factors (i.e. seasonality, trending topics, Google algorithm updates, launch of refreshed website, etc.). If you notice an extreme and sudden increase/decrease in traffic you must first consider these factors.
The rate of increase in traffic and performance metrics is highly dependent on your current level of traffic when you begin updating content. It can sometimes take several months, so don’t get discouraged! Keep an eye on things, and reach out for help if you need it.
Reassess Your CTAs While You Are at It
When you update your content, it’s also a great opportunity to take a second look at your CTAs. Do the CTAs on your posts reflect your current goals and offerings? Are they related to the post topic? Do they add value that will help people progress to the next step? Do you even have a CTA on each of your posts?
This is where Mai Custom Content Areas comes in—it’s a game changer when it comes to creating a conversion marketing strategy on your website! Once you understand what offers, products, services, and educational resources you want to promote, you can easily display calls to action and other custom content in different locations on posts, pages, and custom post types conditionally by category, tag, taxonomy, keyword, and more.
- Use any blocks to create any content you’d like.
- Display the content in various locations on your page/site.
- Conditionally display the content on posts/pages by category, tag, taxonomy, keyword, etc.
- Include or exclude specific posts/pages.
- Works on singular and archive content.
Check out the Mai Custom Content Areas help doc to learn more about how it works.
Final Thoughts
Regular website that maintenance that includes updating old posts so they optimized for SEO, current with the times, and address the needs of your audience, is critical to the long-term growth and sustainability of your business website.
Follow the proven steps in this article, and you will be well on your way to getting more organic traffic, reaching page one in search, and building a loyal following who cannot wait to check out each piece of new content you share.
Download the How to Start Blogging Guide
Explore this FREE GUIDE to take a deep dive into how to start blogging to make money. Get a PDF version of this guide right to your email, plus weekly tips from our blogging experts at BizBudding.


